


Best Layouts for a Small Woodworking Shop: Maximize Space & Efficiency
So, you’re diving into the exciting world of woodworking, huh? That’s awesome! But let’s be real, space is often the biggest hurdle for those starting out. A cramped workshop can quickly feel more like a frustrating obstacle course than a creative sanctuary. Fear not, fellow woodworker! This guide is all about uncovering the best layouts for a small woodworking shop, helping you maximize every square inch and keep your sanity intact.

Understanding Your Workflow: The Key to a Great Layout
Before we dive into specific layouts, let’s talk about you. Seriously! What kind of woodworking are you into? Are you primarily a furniture maker, a hobbyist crafting small projects, or somewhere in between? Your workflow dictates your layout. A furniture maker needs more space for larger projects and potentially heavier machinery. A hobbyist might be happy with a more compact setup. Think about your typical projects, the tools you use most frequently, and the natural flow of your work. This self-assessment is crucial for optimizing your space.
Best Layouts for a Small Woodworking Shop: Top Options
Now for the fun part – exploring layout options! Remember, we’re focusing on maximizing space in a small shop. Let’s examine some proven strategies:
1. The Linear Workflow: Simple and Efficient
Imagine a straight line: that’s your workflow. You start at one end with rough lumber, move through the various stages of woodworking (cutting, shaping, sanding, finishing), and end up with your finished masterpiece at the other end. This minimizes movement and keeps things organized. It’s perfect for smaller shops with limited space.
2. The U-Shaped Layout: Maximizing Wall Space
If you have a larger square or rectangular space, a U-shaped layout can be incredibly effective. You place your major workstations along three walls, creating a central working area. This layout provides ample counter space and allows for easy access to all your tools. Think of it as a woodworking efficiency machine!
3. The L-Shaped Layout: Adaptable and Space-Saving
A smaller version of the U-shaped layout, this option is great for corner spaces. It offers a balance between workflow efficiency and space conservation. Perfect for those who want a slightly more compact setup without sacrificing functionality.
4. Island Layout: Centralized Workspace
For those with enough space, a central “island” workstation can be a game-changer. This allows for multiple people to work simultaneously (if you’re sharing the shop!), and provides a fantastic central hub for your various tools and materials. This layout usually works best in conjunction with one of the previously mentioned configurations.
Choosing the Right Layout for Your Space
So, you’ve thought about your workflow and explored different layouts. Now it’s time to consider the specifics of your small woodworking shop. Measure everything! Seriously, get your tape measure out. Know the exact dimensions of your space, including doorways, windows, and any existing fixtures. This is non-negotiable, folks. You need accurate measurements to create a successful layout.
Essential Elements for Any Small Woodworking Shop Layout
Regardless of your chosen layout, there are certain essential elements that every small woodworking shop needs. Let’s highlight them:
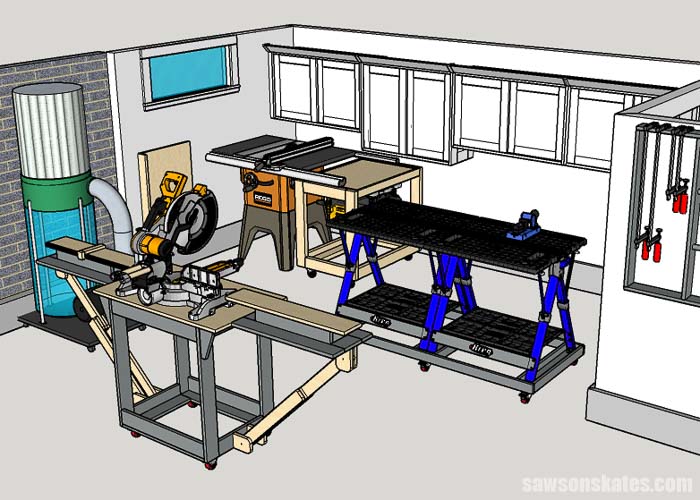
- Adequate Dust Collection: This is crucial for your health and the longevity of your tools. Invest in a good dust collection system, no matter how small your shop.
- Safe & Organized Storage: Keep your tools and materials organized and easily accessible. Proper storage prevents accidents and saves you time searching for items.
- Good Lighting: Poor lighting can lead to mistakes and eye strain. Invest in bright, well-placed lighting.
- Proper Ventilation: Woodworking involves fumes and dust. Ensure your shop is well-ventilated to prevent buildup.
- Ergonomic Setup: Set up your workstations to prevent aches and pains. Consider the height of your work surfaces and the placement of tools.
Best Layouts for a Small Woodworking Shop: Refining Your Plan
Once you’ve selected a base layout and identified the essential elements, it’s time for the fine-tuning. Start by placing your largest and most frequently used machines first. Then, arrange your smaller tools and workbenches around them, optimizing workflow. Don’t be afraid to experiment with different arrangements until you find something that feels intuitive and comfortable.
Think Big, Work Smart
Remember, even in a small space, you can create a highly functional and productive woodworking shop. The key is to carefully plan your layout, prioritize efficiency, and choose the right tools. Don’t get overwhelmed. Take it one step at a time. Measure twice, cut once – and layout meticulously! Before you know it, you’ll be turning wood into beautiful creations in your perfectly organized small workshop.
Conclusion
Designing the best layouts for a small woodworking shop is a blend of creativity, practicality, and careful planning. By understanding your workflow, selecting the right layout, and incorporating essential elements like adequate dust collection and safe storage, you can transform a cramped space into an efficient and enjoyable woodworking haven. Remember to take measurements, experiment with arrangements, and prioritize ergonomics for a truly optimized workspace.
Frequently Asked Questions
Q1: How much space do I really need for a small woodworking shop?
A1: It depends on your projects! A very small hobbyist space could be as little as 100 square feet, but for larger projects, 200+ square feet might be necessary.
Q2: What’s the most important factor to consider when designing my layout?
A2: Your workflow. How you move through your woodworking process should dictate the layout. Consider the order of your operations.
Q3: How can I maximize storage in a small space?
A3: Utilize vertical space with shelving, pegboards, and wall-mounted cabinets. Opt for stackable storage containers and keep things organized.
Q4: What are some good resources for planning a woodworking shop layout?
A4: Online articles, woodworking forums, and even woodworking magazines offer various plans and ideas. You can also hire a professional to help design your shop’s layout for you.
Q5: Is it okay to adjust my layout after I set it up?
A5: Absolutely! Your workshop is an evolving space; it’s fine to tweak things as you gain more experience and understand your workflow better. freeslots dinogame


