


Maximize Your Space: How to Optimize Space When Setting Up a Woodworking Workshop
So, you’re diving headfirst into the wonderful world of woodworking? That’s awesome! But before you start envisioning masterpieces, let’s talk about something equally crucial: space optimization. Having a well-organized woodworking workshop isn’t just about aesthetics; it’s about safety, efficiency, and ultimately, your sanity. This guide will help you conquer the challenge of how to optimize space when setting up a woodworking workshop, turning your cramped corner into a woodworking haven.

Planning Your Woodworking Workshop Layout: Measure Twice, Cut Once (Literally!)
Before you even think about buying a single clamp, grab a measuring tape and start planning. Seriously, this is the most important step. Measure your space meticulously – every nook, every cranny. Sketch it out on paper or use a digital design tool. This will allow you to visualize the layout and identify potential problem areas before you’ve committed to anything.
Consider the workflow. Think about the sequence of steps involved in your typical project. Ideally, you want a logical flow, minimizing the need to trek across the workshop with heavy lumber or awkward tools. For example, your lumber storage should be close to your cutting area, and your finishing station should be separate to prevent dust contamination.
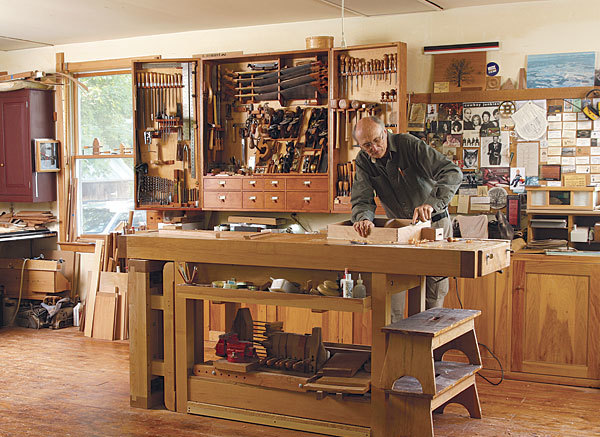
Vertical Space: Your Secret Weapon
Think upwards! Vertical space is often underutilized in woodworking shops. Here’s how to harness its power:
- Wall-mounted storage: Shelves, pegboards, and cabinets are your best friends. They keep tools and materials off the floor, freeing up valuable floor space.
- Overhead storage: If your ceiling height allows, consider installing overhead storage racks for less frequently used items.
- Vertical tool organizers: For hand tools, look for vertical organizers that hang on the wall or fit neatly into a cabinet.
Clever Storage Solutions for a Space-Saving Woodworking Workshop
Storage is the name of the game when it comes to how to optimize space when setting up a woodworking workshop. But smart storage is key. Don’t just cram everything into any available space. Here are some ideas to keep things organized and easily accessible:
- Mobile workbenches: These are great for smaller workshops, allowing you to move your workspace as needed.
- Rolling tool chests: These keep your tools organized and easily movable, making it easy to reposition them based on your current project.
- Cabinet organization: Use drawer dividers, bins, and other organizational tools to keep your cabinets neat and tidy.
- Lumber storage: Invest in a lumber rack to store wood efficiently and keep it dry and protected from damage.
Choosing the Right Equipment: Size Matters
Don’t just buy the biggest tool you can find! Consider the size of your workshop and the types of projects you’ll be undertaking. A smaller, more efficient tool may be a better fit for a limited space. For example, a bandsaw might be a better choice than a large floor-standing saw for a smaller space.
Multi-Functional Tools: One Tool, Many Uses
Space saving means getting more from less. Invest in multi-functional tools that can handle multiple tasks. A combination square, for instance, can perform a surprising number of measurement and marking tasks.
How to Optimize Space When Setting Up a Woodworking Workshop: The Finishing Touches
Once you’ve got the major elements in place, there are a few finishing touches that can make a huge difference. These small things can create a more efficient, safer, and enjoyable woodworking space.
- Good lighting: Proper lighting is essential for safety and accuracy. Consider LED work lights or a well-placed shop light.
- Dust collection: A good dust collection system is crucial for a healthy and clean workshop. Even a small shop vacuum can make a big difference.
- Organization system: Develop a system for organizing your tools and materials and stick to it! This will save you valuable time and frustration in the long run.
Embrace the Minimalist Approach
Remember, less is often more in a small workshop. Only keep the tools and materials you regularly use. Consider donating or selling items you don’t need.
Conclusion
Setting up a woodworking workshop can be an exciting but challenging process. By carefully planning your layout, utilizing vertical space, choosing the right equipment, and embracing smart storage solutions, you can create a functional and efficient workspace, regardless of its size. Remember, the key to how to optimize space when setting up a woodworking workshop is careful planning and a commitment to organization. Now get out there and build something amazing!
Frequently Asked Questions
Q: What if I don’t have much space?
A: Don’t despair! Many woodworking enthusiasts thrive in small spaces. Focus on vertical storage, multi-functional tools, and a lean approach to tool ownership. Prioritize essential tools and techniques.
Q: How important is dust collection?
A: Dust collection is crucial for both health and safety reasons. Wood dust is a respiratory hazard. Even a basic dust collection system makes a huge difference.
Q: What type of lighting is best for a woodworking shop?
A: Bright, even lighting is key. Consider LED shop lights or fluorescent tubes for even illumination. Avoid shadows which can hamper accuracy.
Q: How do I choose the right workbench?
A: The right workbench depends on your needs and space. Consider factors like size, height, and the type of work you do. A mobile workbench can be a space-saving solution.
Q: What’s the best way to organize my tools?
A: Develop a system that works for you. This could include pegboards, tool chests, or even simple labeled bins. Consistency is key! A well-organized shop is a productive and safer shop. freeslots dinogame


